Windows上安装
对于windows7或8使用docker toolbox安装
由于windows10(专业版)上有内置的hyper-v虚拟机可以选择docker for windows安装
docker for windows(方法1)和docker toolbox(方法2)的区别:
docker toolbox:docker运行是需要linux内核的,为了能在非linux系统使用docker,官方早期提供的Toolbox方案就是使用虚拟机启动一个linux,然后在这个虚拟机中运行docker,免费的虚拟机当时使用最多的就是virtualbox
docker for windows:原生版本的docker,在windows上是使用的windows10内置的hyper-v虚拟机,所以不在需要安装virtualbox,但是对系统的要求也提高了,因为hyper-v的虚拟机只有部分版本的windows10才有内置,比如家庭版的windows10就没有hyper-v组件,不能运行原生版本的docker,还是只能通过toolbox。
阿里云的镜像docker toolbox: http://mirrors.aliyun.com/docker-toolbox/windows/docker-toolbox/
docker for windows: https://www.docker.com/get-started
Linux上安装
# 1.查看环境
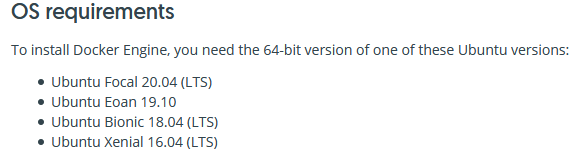
因为Docker对系统环境有要求,如unbuntu
qiusj@u20:~$ uname -r
5.4.0-7634-generic

qiusj@u20:~$ cat /etc/os-release
NAME="Pop!_OS"
VERSION="20.04 LTS"
ID=pop
ID_LIKE="ubuntu debian"
PRETTY_NAME="Pop!_OS 20.04 LTS"
VERSION_ID="20.04"
HOME_URL="https://pop.system76.com"
SUPPORT_URL="https://support.system76.com"
BUG_REPORT_URL="https://github.com/pop-os/pop/issues"
PRIVACY_POLICY_URL="https://system76.com/privacy"
VERSION_CODENAME=focal
UBUNTU_CODENAME=focal
LOGO=distributor-logo-pop-os
2
3
4
5
6
7
8
9
10
11
12
13
14
15
16
17
# 2.安装(docker-ce社区版)
方式一:使用官方安装脚本自动安装
$ curl -fsSL https://get.docker.com | bash -s docker --mirror Aliyun

# 或使用国内daocloud 一键安装命令
$ curl -sSL https://get.daocloud.io/docker | sh
2
3
4
方式二:手动安装
#  1)卸载旧的版本
$ sudo apt-get remove docker docker-engine docker.io containerd runc

#  2)通过docker仓库安装,先安装需要的依赖环境
$ sudo apt-get update
$ sudo apt-get install \
    apt-transport-https \
    ca-certificates \
    curl \
    gnupg-agent \
    software-properties-common

# 3)添加Docker官方的GPG 密钥,验证key的指纹
$ curl -fsSL https://download.docker.com/linux/ubuntu/gpg | sudo apt-key add -
$  sudo apt-key fingerprint 0EBFCD88
pub   rsa4096 2017-02-22 [SCEA]
      9DC8 5822 9FC7 DD38 854A  E2D8 8D81 803C 0EBF CD88
uid           [ 未知 ] Docker Release (CE deb) <docker@docker.com>
sub   rsa4096 2017-02-22 [S]

# 4)添加稳定的镜像仓库
# $ sudo add-apt-repository \
#   "deb [arch=amd64] https://download.docker.com/linux/ubuntu \
#   $(lsb_release -cs) \
#   stable"
# 使用国内阿里云仓库
$ sudo add-apt-repository \ "deb [arch=amd64] https://mirrors.aliyun.com/docker-ce/linux/ubuntu \ $(lsb_release -cs) \ stable"

#访问源列表里的每个网址,并读取软件列表,然后保存在本地电脑。
$ sudo apt-get update

# 5)安装最新的docker ce 和 containerd
$ sudo apt-get install docker-ce docker-ce-cli containerd.io

# 查看验证docker是否安装成功
$ sudo docker run hello-world

Unable to find image 'hello-world:latest' locally
latest: Pulling from library/hello-world
0e03bdcc26d7: Pull complete
Digest: sha256:49a1c8800c94df04e9658809b006fd8a686cab8028d33cfba2cc049724254202
Status: Downloaded newer image for hello-world:latest

Hello from Docker!
This message shows that your installation appears to be working correctly.

To generate this message, Docker took the following steps:
1. The Docker client contacted the Docker daemon.
2. The Docker daemon pulled the "hello-world" image from the Docker Hub.
    (amd64)
3. The Docker daemon created a new container from that image which runs the
    executable that produces the output you are currently reading.
4. The Docker daemon streamed that output to the Docker client, which sent it
    to your terminal.

To try something more ambitious, you can run an Ubuntu container with:
$ docker run -it ubuntu bash

Share images, automate workflows, and more with a free Docker ID:
https://hub.docker.com/

For more examples and ideas, visit:
https://docs.docker.com/get-started/

# 6)设置开机自启动并启动 Docker-ce(安装成功后默认已设置并启动,可忽略)
sudo systemctl enable docker
sudo systemctl start docker


# 7)卸载docker(卸载依赖,删除目录:/var/lib/docker是docker的默认工作路径)
$ sudo apt-get purge docker-ce docker-ce-cli containerd.io
$ sudo rm -rf /var/lib/docker
2
3
4
5
6
7
8
9
10
11
12
13
14
15
16
17
18
19
20
21
22
23
24
25
26
27
28
29
30
31
32
33
34
35
36
37
38
39
40
41
42
43
44
45
46
47
48
49
50
51
52
53
54
55
56
57
58
59
60
61
62
63
64
65
66
67
68
69
70
71
72
# 3.配置镜像加速
这里使用阿里云镜像加速。
登陆阿里云,找到容器镜像服务,找到镜像加速器。
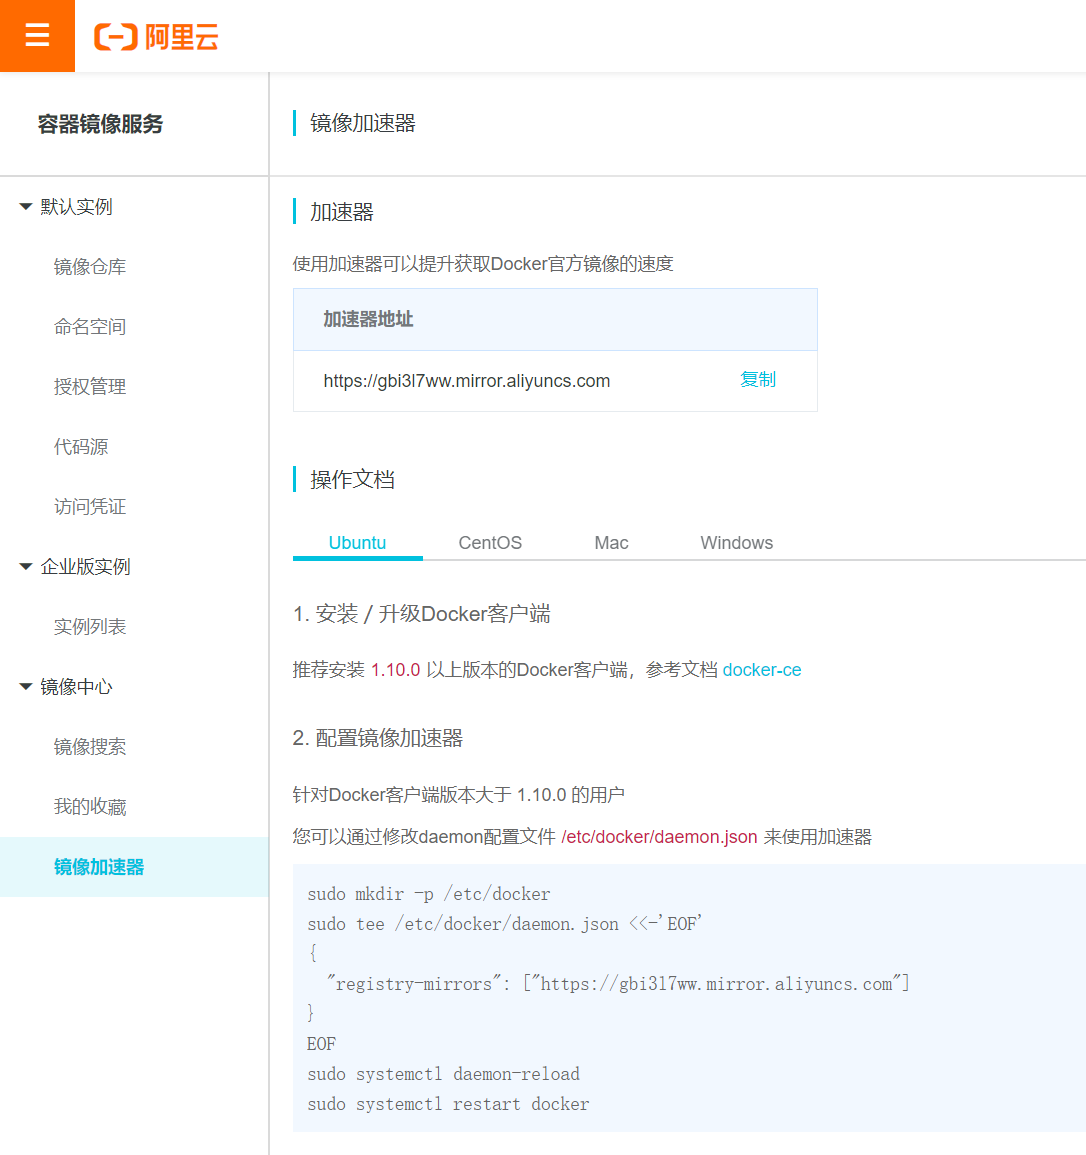
配置使用
qiusj@u20:~$ sudo mkdir -p /etc/docker
[sudo] qiusj 的密码:
qiusj@u20:~$ sudo tee /etc/docker/daemon.json <<-'EOF'
> {
>   "registry-mirrors": ["https://gbi3l7ww.mirror.aliyuncs.com"]
> }
> EOF
{
  "registry-mirrors": ["https://gbi3l7ww.mirror.aliyuncs.com"]
}
qiusj@u20:~$ sudo systemctl daemon-reload
qiusj@u20:~$ sudo systemctl restart docker
2
3
4
5
6
7
8
9
10
11
12
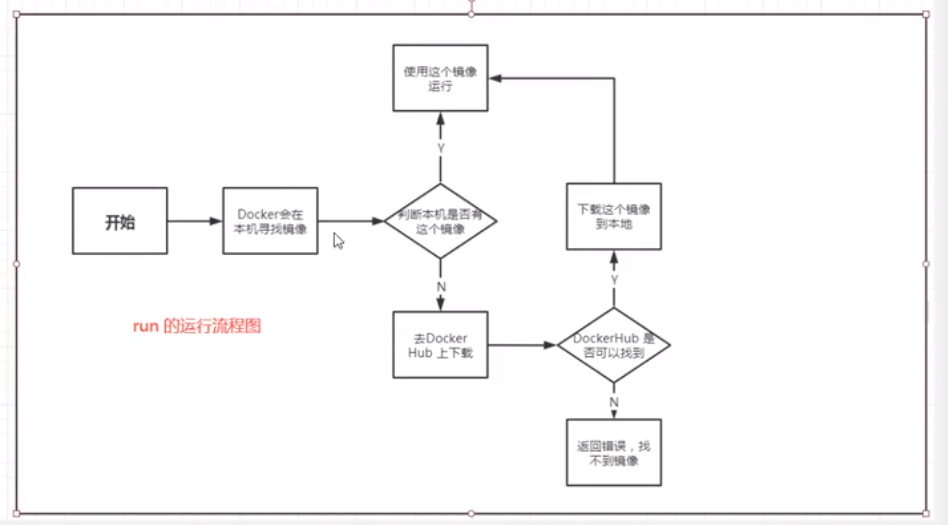
# 4. 运行流程
在手动安装环节,我们为了验证docker是否安装成功运行一个hello-world镜像,其中run命令的运行流程如下图:
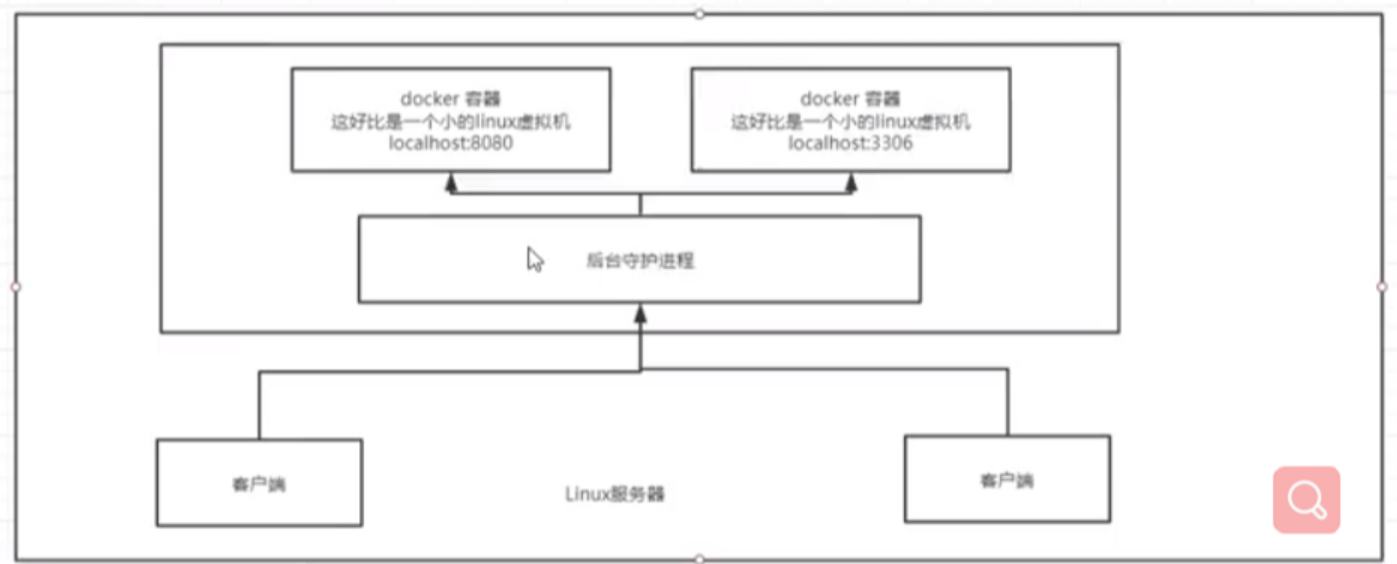
# 5.底层工作原理
Docker是一个Client-Server结构的系统,Docker的守护进程运行在主机上。通过Socket从客户端访问,当DockerServer接收到Docker-Client的指令后就会执行该指令。